How to create SSL-Wildcard certificates with acme.sh on Synology NAS
About this project:
This guide shows you how to create a wildcard SSL certificate for your domain to point to your Synology NAS. To do this, you need to register the domain with a domain registrar and access the DNS settings. This saves money as you don't have to buy an expensive wildcard SSL certificate from Digicert or another retailer, but instead obtain an SSL certificate from https://letsencrypt.org/.
Short facts:
- Tested for Synology DSM 7.2.
- DNS name server must be used by Cloudflare, therefore a Cloudflare account must be created.
- Own domain must be used.
- DNS-Challenge is used to validate the ownership of the domain
- The certificates are automatically renewed by the NAS and you never have to worry about a new SSL certificate again
- Make sure you have a static IP-adress!
Important: In all commands, the inverted commas in a command or script must be copied and only the value in between must be changed!
Step by step instructions:
- Create a new user with the name "acme" with admin rights and set up the 2-factor TOTP verification. When setting up TOTP, make sure that the TOTP secret is added to the script in the YAML file wich will follow. Furthermore make sure to save the new users login-credentials in your preferred password manager!
- Now create a ".yml" file, i.e. a YAML file, with Visual Studio Code or another editor and name it "docker-compose.yml". Further values are inserted and changed in this file in the next steps.
- Now open the YAML file and insert the following script, and make sure that the formatting remains the same!
version: "2"
services:
  acme.sh:
    image: neilpang/acme.sh
    container_name: acme
    environment:
      - PUID=1030   # acme user id from the above command
      - PGID=101    # administrators group
      - TZ=Europe/Paris
      - UMASK_SET=002
      # CloudFlare API
      - CF_Token="__REPLACE_ME_WITH_CLOUDFLARE_TOKEN___"
      - CF_Email="__REPLACE_ME_WITH_EMAIL__"
      # SYNO Deploy hook
      - SYNO_Scheme="https"
      - SYNO_Hostname="__REPLACE_ME_" # The IP or hostname you can reach your NAS on
      - SYNO_Port="5001"
      - SYNO_Username="acme"
      - SYNO_Password="__REPLACE_ME_WITH_USER_ACME_PASSWORD__"
      - SYNO_TOTP_SECRET="__REPLACE_ME_WITH_TOTP_SECRET__"
      - SYNO_DID="__REPLACE_ME_WITH_DID_COOKIE_VALUE__"
      - SYNO_Certificate="*.somedomain.com"
      - SYNO_Create=1
    network_mode: host
    volumes:
      - /volume1/docker/acme/config:/acme.sh
    command: daemon
    restart: unless-stopped
- PUID = Insert the uid of the newly created user "acme" here.
- PGID = Insert the pgid of the newly created user "acme" here.
- TZ = Look up your time zone here: https://timezone.mariushosting.com/, and then add it to the YAML file.
- CF_Token = Insert the Cloudflare API token you created here
- CF_EMAIL = Insert the email address you used to log in to Cloudflare here
- SYNO_Hostname = Insert your domain here -> "mydomain.com"
- SYNO_Username = Insert the name of the newly created user "acme" here
- SYNO_DID = Insert the cookie value here
- SYNO_Certificate = Enter the name of the domain for which you want to create the corresponding wildcard certificate. !!It is important that the asterisk within the inverted commas remains as it indicates that you want to create a wildcard certificate.!!
im folgenden erfährst du wie du die Werte bekommst:
- Create the new folder "acme" in the folder "docker" in the file station and then create the folder "config" in it.
- Connect to your NAS via SSH with PuTTY or another SSH client and log in with the user "acme".
- Make sure that you have root privileges by entering the following command. After entering this command, you will be asked again for the password for the user "acme":
sudo -i
- With the following command you must now find out the so-called "uid" i.e. the user-id and the so-called "gid" i.e. the group-id.
id acme
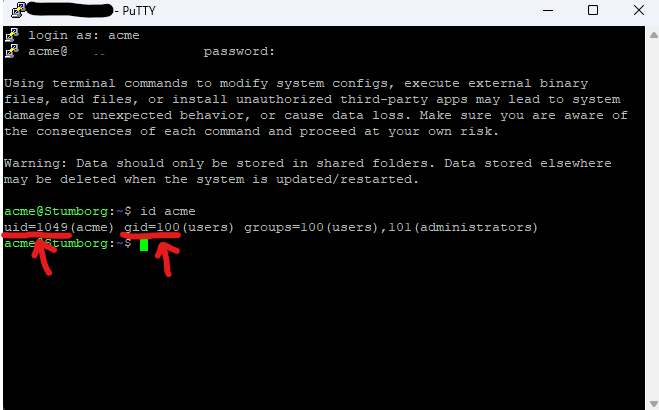
8. Add the two values to the YAML file.
9. Now we need to switch to the Cloudflare website and its dashboard:
1. Go to the Cloudflare website: https://www.cloudflare.com/.
2. Create an account there if you don't already have one and log in with your account details.
3. Change the DNS-Nameservers at your domain registrar to those of Cloudflare, instructions can be found here: https://developers.cloudflare.com/automatic-platform-optimization/get-started/change-nameservers/.
5. Wenn alle DNS-Einstellungen und Records übertragen und geändert wurden, gehe sicher dass der DNS-Proxy von Cloudflare nicht verwendet wird da euer NAS sonst nicht über das Internet erreichbar sein wird
6. Next you have to create a zone DNS API token with your Cloudflare account, instructions can be found here: https://developers.cloudflare.com/fundamentals/api/get-started/create-token/. Make sure that these values are also set for you: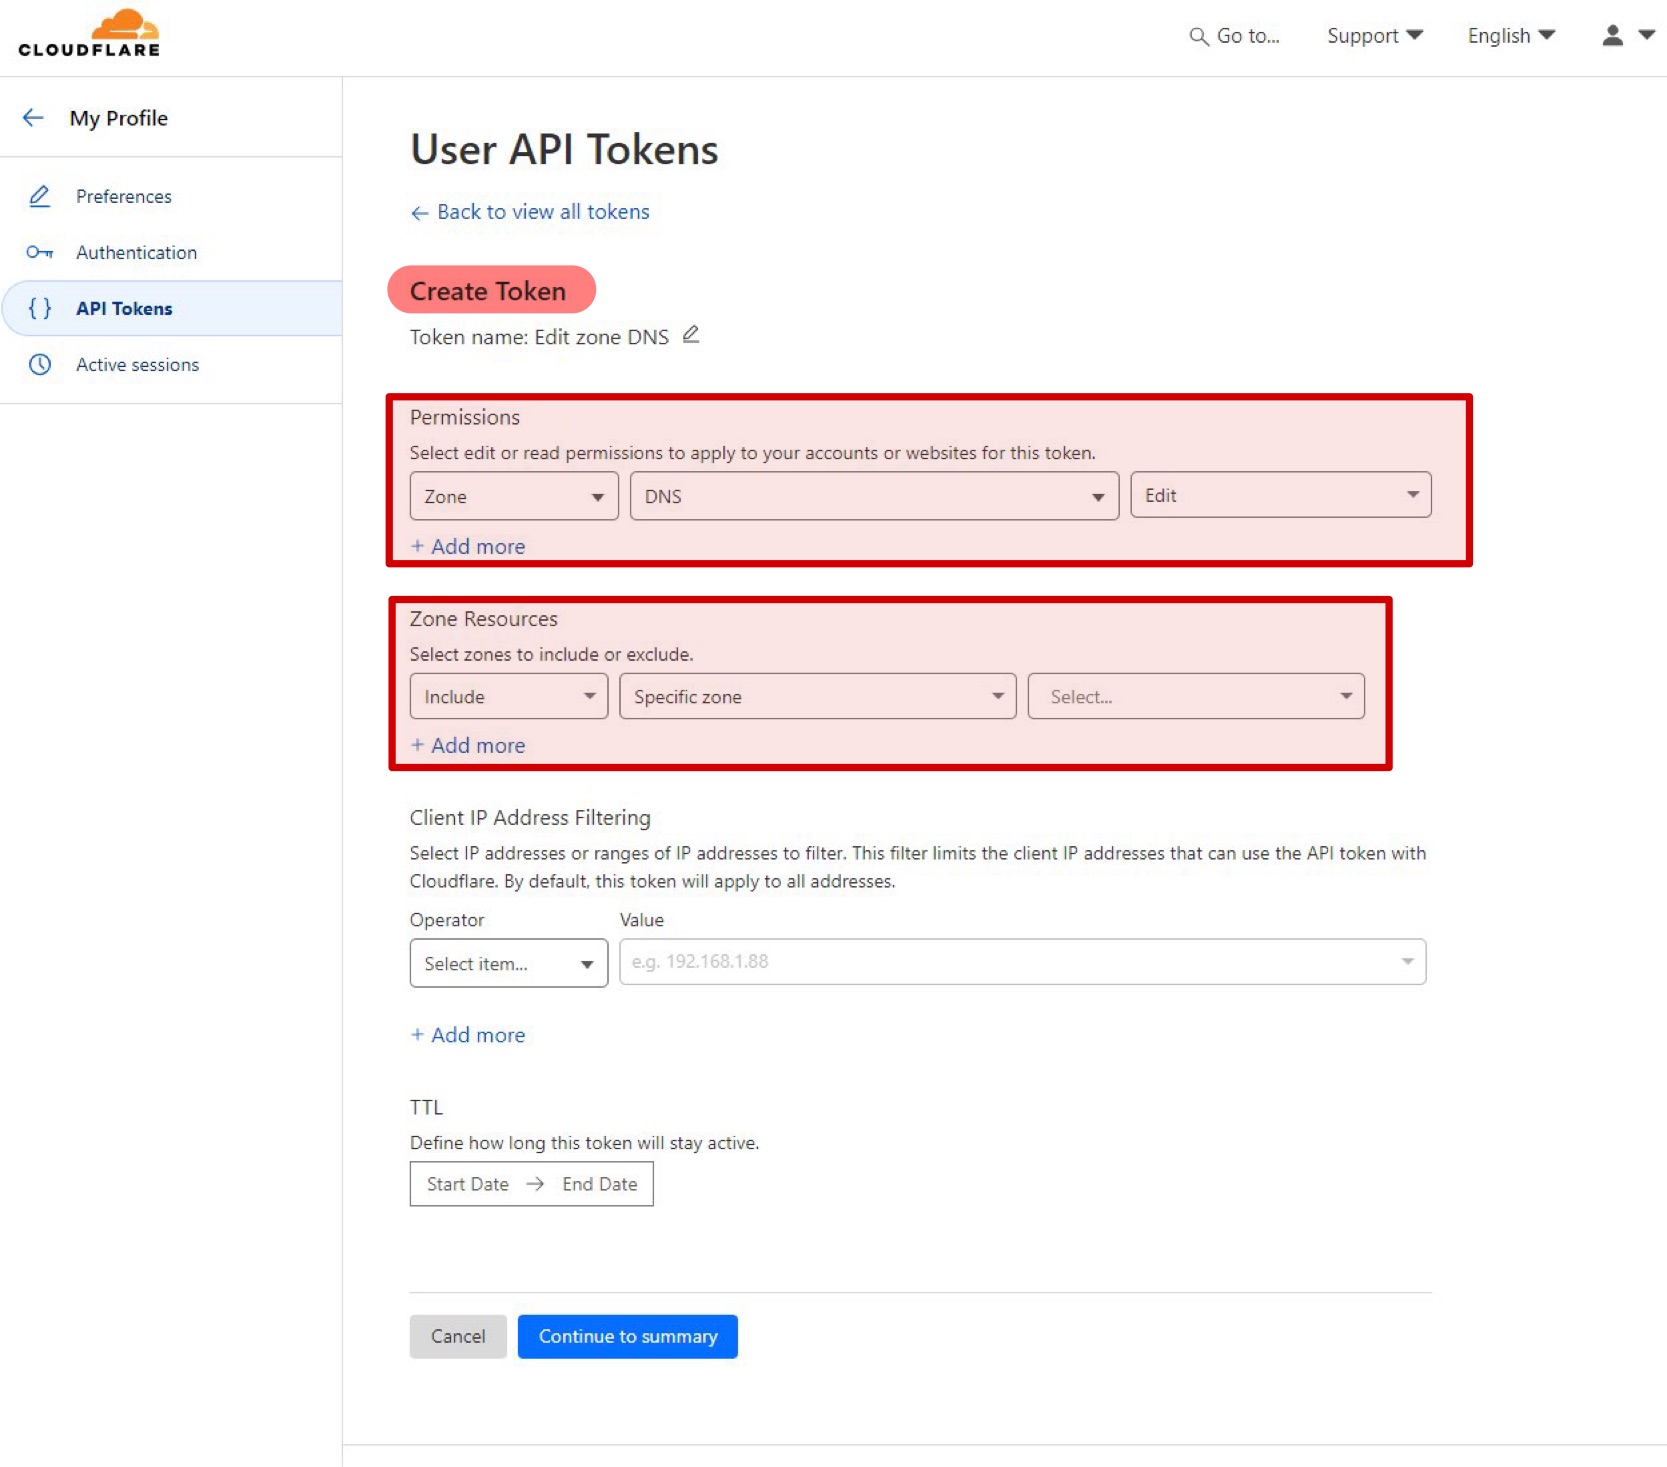
7. Write down the API token and make sure that only you can read it!
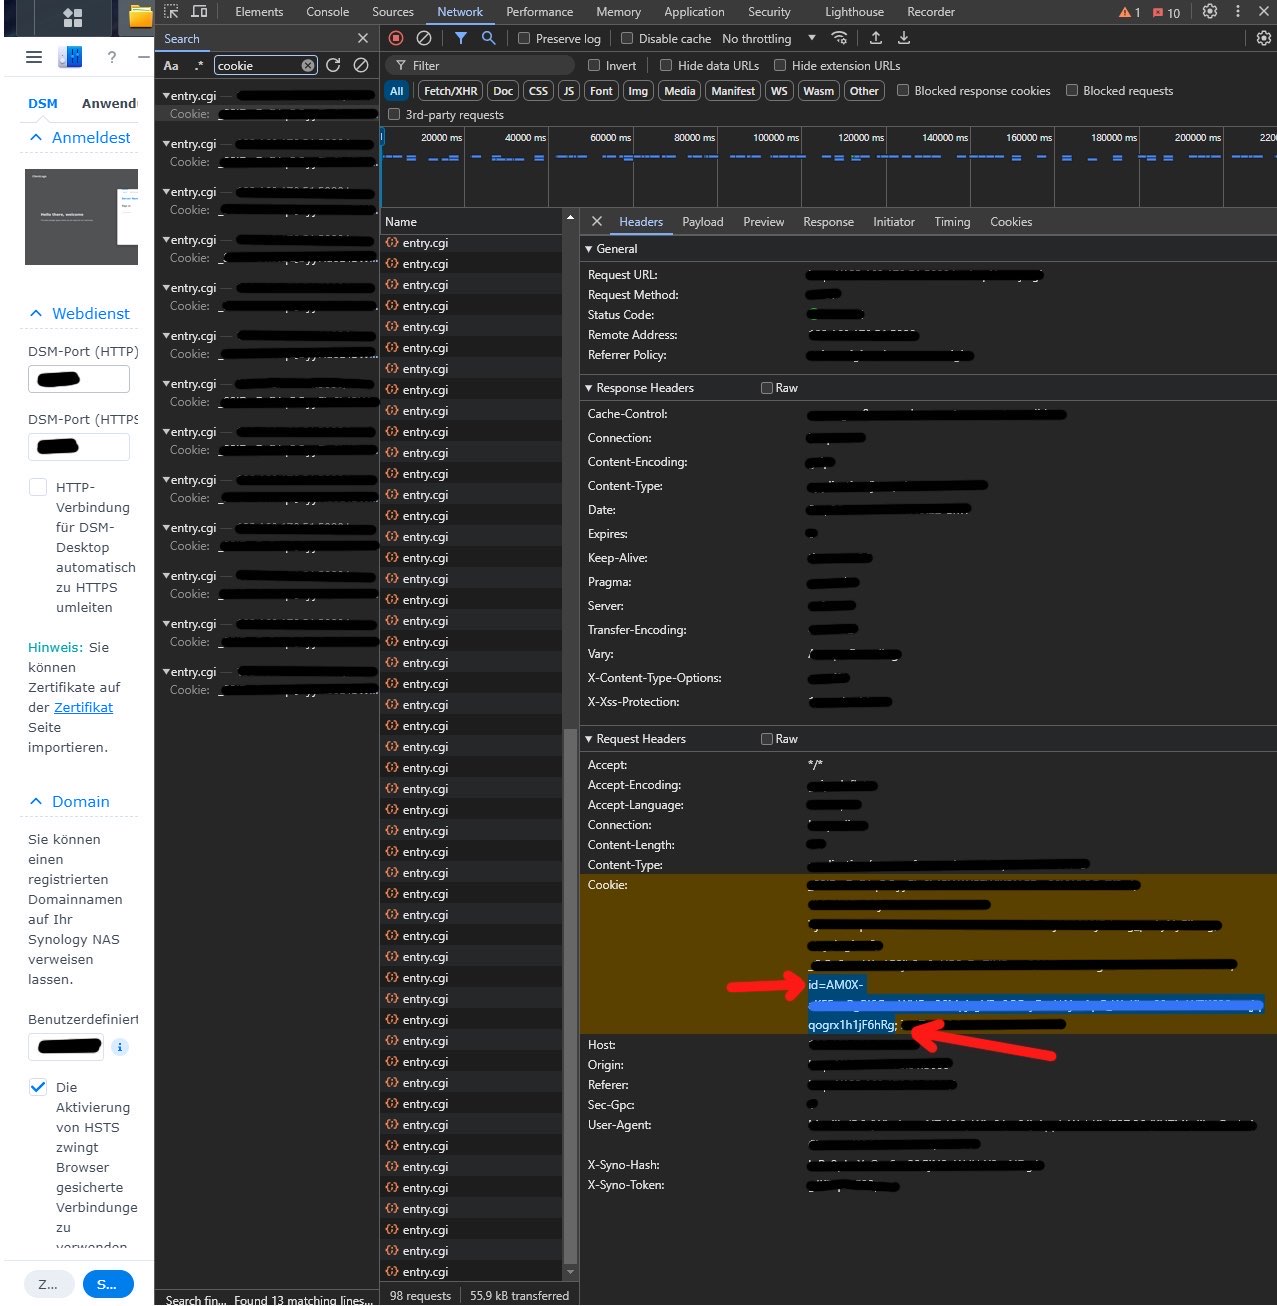
10. Now comes the most difficult part, namely you have to find out the cookievalue of your Synology NAS
1. Log in to Synology DSM with user "acme
2. Open the developer tools of the browser with the F12 key
3. Navigate to Network and search for "Cookie" and add the value after "id=" it to the YAML file:
11. If all values have been inserted into the script and changed correctly, the finished YAML file must be stored in the following directory: "/volume1/docker/acme". In addition, the subfolder "config" must be created under the "acme" folder.
12. Change to the directory just created with the following command:
cd /volume1/docker/acme
- Start the "acme" Docker container using SSH, with the following command: ````
sudo docker-compose up -d
- In the "acme" script, ZeroSSL is stored as CA by default. We change this with the following command:
sudo docker-compose exec acme.sh --set-default-ca --server letsencrypt
- Als nächstes muss das Zertifikat erstellt werden. Dies machen wir mit dem folgenden Befehl: (Please note! "somedomain" must be replaced by the domain for which the certificate is to be created).
sudo docker-compose exec acme.sh --issue --dns dns_cf -d "somedomain.com" -d "*.somedomain.com"
- Once the process has been completed via SSH, the certificate files can be viewed via Synology-DSM in the file station, under the directory: /volume1/docker/acme/config/somedomain.com_ecc. Which files are required is displayed in the command line as one of the last lines.
- Als nächstes kann noch eine Automation eingerichtet werden mit der man sich nicht mehr um die Erneuerung der Zertifikate kümmern muss. Diese wird mit folgenden Befehl eingestellt:
sudo docker-compose exec acme.sh --deploy --insecure -d somedomain.com --deploy-hook synology_dsm --debug
Achtung! : "mydomain.com" muss hier wieder mit der eigenen Domain ersetzt werden.
12. Zusätzliches: Wenn man die Domain welche auf das NAS noch verwenden möchte um auf der Hauptdomain einen bestimmten Inhalt zu zeigen, sollte man noch den Diskstationmanager(DSM) auf einer Subdomain erreichbar machen. Dies hat den Vorteil dass dies ein wenig mehr Sicherheit gibt wenn man über die Hauptdoamin
- Um dies zu machen folge: Systemsteuerung > Anmeldeportal > DSM > Domain > Domain ändern auf z.B. "nas.somedomain.com".
- Im Anschluss muss noch eine Subdomain mit einem A-Record in den DNS-Einstellungen von eurem Domainregistrar erstellt werden.
Cloudflare DNS PRoxy aus
Auto renewal skript checken -> Notizen in ChatGPT
sudo docker-compose exec acme.sh --deploy -d *.stumborg.de --deploy-hook synology_dsm --debug
Befehl um Zertifikat selbst zu erneuern:
cd /volume1/docker/acme
sudo docker-compose exec acme.sh --issue --dns dns_cf -d "somedomain.com" -d "*.somedomain.com" --force
sudo docker-compose exec acme.sh --issue --dns dns_cf -d "stumborg.de" -d "*.stumborg.de" --force
- Privater Schlüssel -> Cert Key (somedomain.com.key)
- Zertifikat -> Cert (somedomain.com.cert)
- Zwischen Zertifikat -> intermediate (ca.cer)